
War. War never changes.
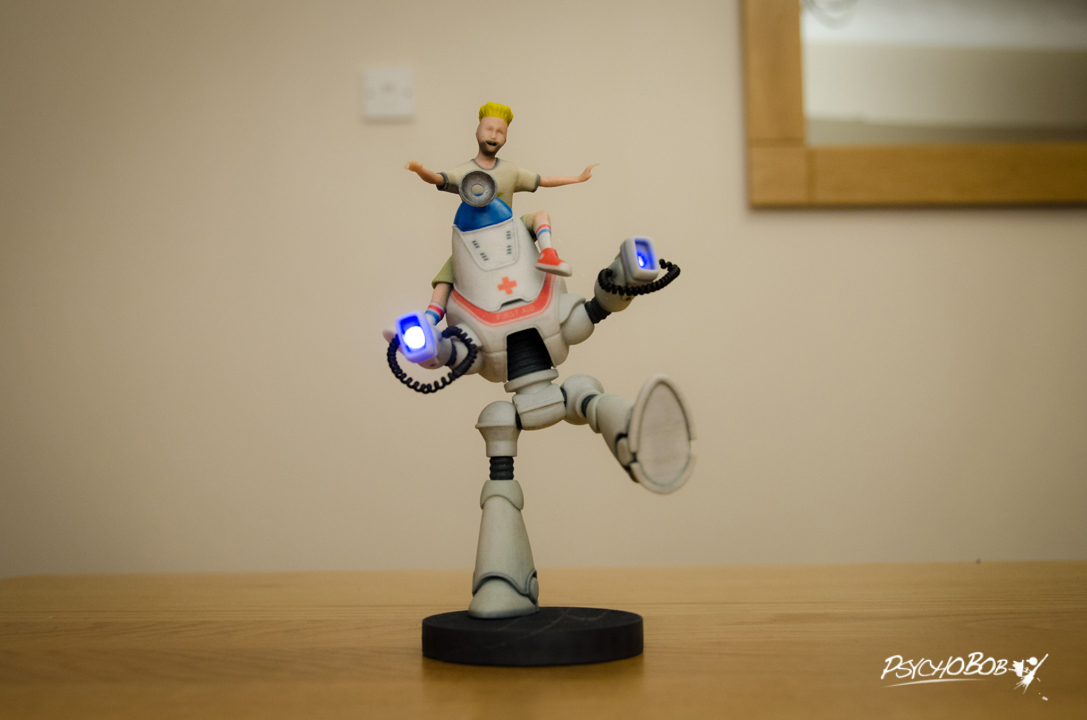
Like many people I have been playing a bit of Fallout 4 and when I came across the "Massachusetts Surgical Journal" I thought the composition and subject on the cover was too good not to give it a go. The protectron is a little different to the in-world model you see, which made it more interesting to me and the pose with the kid riding on it's shoulders looked great. I needed something to get me back into 3D printing and the idea didn't feel like it would be so challenging that it was beyond my abilites, but not so easy that it wouldn't keep me interested. I felt the kid would present me with the biggest challenge as I typically am typically making hard surface model rather than organic.
YouTube Video
As normal, I'll start with an embedded Youtube video.
Planning
Seeing as there was a kid in the model and there was no moving parts I decided I would get this printed in the "Full Colour Sandstone" (FCS) material from Shapeways. As with most of my prints, this wasn't going to be a large scaled model and this would make detailing the kid a lot easier. This means I needed to keep in mind the FCS design guidelines as it is more fragile than other materials so ticker walls would be needed. During the modelling stage however, I do push the guidelines a bit and suffer for that; more on that later.

FCS being a much more fragile material always concerns me a bit. Like the white nylon material "Strong and Flexible" (WSF) from Shapeways, I believe it is printed in a manner where there is a vat of powder all around it acting as support. This is great for the printing process, but FCS comes out the printer in a very "green" or fragile state (almost like damp plaster that hasn't fully dried). It is prone to breakage, dents and falling apart. Once it comes out the printer it is left to dry out and then is later infused with something similar to super glue to harden it. So this particular pose with the legs and arms sticking out made me think that the arms and legs will take damage when they take it out of the printer, so I planned for these to be printed separatly. This also allows me to use more than 1 million polygons which is the limit for individual models with Shapeways.
Some parts would be printed in in "Frosted Ultra Detail" (FUD); a slightly transparent material capable of much smaller and finer detail ... it also smells like marzipan! This was so I could print some parts somewhat transparent like the head dome and the defibrillator diffusers. The defibrillator wires I was originally going to make with copper wire but let's just say the curled shape didn't hold for long, so I decided to print those in FUD also.
Lastly, I wanted to add in some LEDs for the electrical crackling from the difribilators (because who doesn't like LEDs!?!). I wanted them to flicker so I looked into how I could make this with 555 timers but they were all too bulky and complicated for what is a simple application. So I went straight for some candle LEDs. Whenever I incorporate some simple LEDs, I like to use micro USB as the power source. No need to swap batteries, and micro usb plugs are incredibly common and cheap.
Making the 3D model
I started with the protectron and modelled it into a T-Pose. This is fairly common practice as it lets you easily model all around the character without too much getting in the way. Whilst I made the whole protectron hollow and the model is symmetrical, the base of the left leg and righ were modelled slightly differently. The left leg would be sticking up and forward (and be visible), so the base of the foot was made solid and it was given a bevelled lip around the permimeter for aesthetics. The right leg would be the leg on the ground holding the model up, but this is also the route for the wire so a hole was left in the center to allow the wire to pass through, and the base was made flat and level so when it was glued to the bade, it had more surface area.
Next came the kid which I knew would be the trickier of the two characters for me. The hair was particularly tricky as I normally use hair emiiters when I've done hair in the past, which effectively will offload a lot of the job to the rendering engine. However you can't use this in 3D printing, everything has to be real geometry so that mean I ended up trying to sculpt it from a dense mesh. Like I've said before, I'm not very confident in my organic models yet.
Once the models were ready it was time to rig and pose them. This involves building a skeleton for each one, binding the skeletons to each mesh and then making some deformation maps to control where and how the meshes bend. This takes a while to do, but I feel it is worth it as it provides limitations on where things can move or can't as well as making the actual posing or refining of pose a lot easier. During the posing stage, I did try to make the center of mass over the right leg as much as possible, FCS doesn't need to be handled with 'kid gloves' but it is more fragile than my usual choice of materials so I wanted to take care not too much pressure was being added onto the hip joint and cause things to snap easily.
Once posed, I then froze the model into the pose and then went back in to do some further modelling. I decided to do it this way as some of the geometry needed to be cut away depending on the final pose and it wasn't being animated. After freezing the geometry I then sculpted in some further detail on the kid (i.e. some muscles in the legs and arms, wrinkles in the shirt) and cut away some of the protectrons internal geometry to make sure the wire route was clear.

The print order from Shapeways
Normally there's nothing to say in regards to ordering the 3D print from Shapeways, but this time it was one problem after another. I said it in the video and I'll say it here, it was feeling like a cursed project! If you wish to join me on this bumpy road, read on. If not, you may want to skip this section :
(Really not a fan of "Big Brother" myself, but reading this section back to myself, all I can hear is the the voice of the chap who did the voice over :S)
Day 1: I placed the order on the 1st of the new year, and like many of you I'm sure when placing online orders, you find yourself checking on the websites constantly to see an order progress. Shapeways estimates 6 business days for FCS as well as similar times for WSF and FUD.
Day 8: Things were still in "pre-production" indicating the part hadn't been printed yet even though it was due to ship according to the estimate. I was expecting a little bit of a delay with it being the xmas/new year period, but not even moving to the production stage after 8 days concerned me, so I decided to drop them an email.


I had a response from one of the customer service team saying it was on route to their distribution center and should arrive in a couple of days, so things were delayed a little but they were moving. Shortly after that email an automated email came through saying the order was delayed and they estimate the new shipping date to be 7 days later ..... oh :( This puts the new shipping estimate at 17 days after order, not good for those who are impatient with orders like myself! At least I was notified I guess.
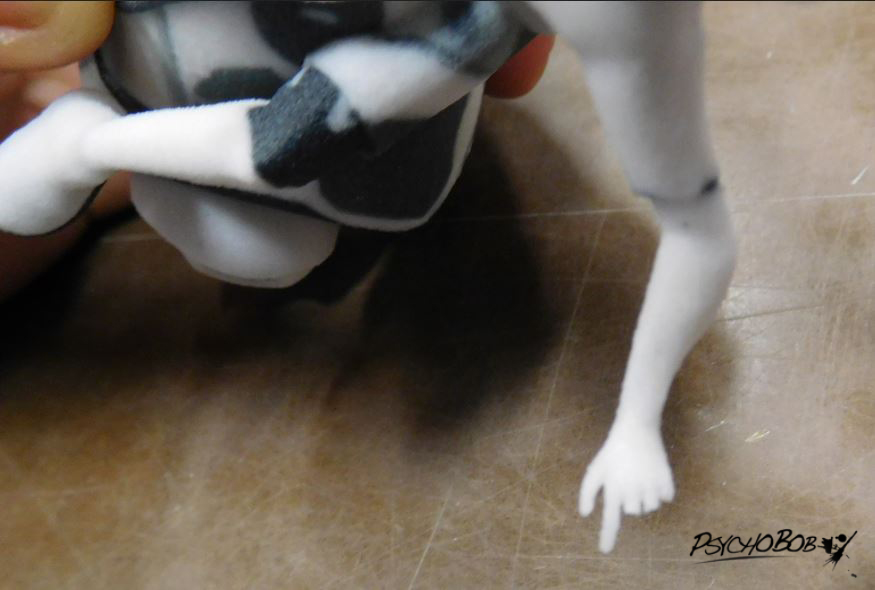
Day 12: A couple of days later another email comes through. A customers service agent contacted me to let me know they spotted a problem with one of the parts and sent me a picture. They said that the fingers broke off and whether it was acceptable or if I wanted to pursue a refund or re-print. At this point before seeing the picture I already considered the fingers breaking and was going to accept it. The size really was pushing the FCS design guidelines so I was for the most part expecting this. So I open the picture and notice something else other than the broken fingers .... what is going on with the texture! It's mostly white and has what seems to be random grey patches in places. So I respond letting them know that their picture has highlighted some other than broken fingers that I wasn't ready to accept. Shapeways website render seemed to show the texture mapping correctly, but it's possible I had introduced something odd into the model files. Did I mess up on the texure mapping?
Turns out the problem was on their side, so a reprint was needed.
Day 16: On day 12, the order was moved back to "processing" according to the website which is the beginning of the process ... and it hadn't moved since. The estimated shipping date also hadn't updated since the original order so I didn't know when it was shipping out. An email goes out to them asking for an update and ETA. A day later Shapeways responds and lets me know it will be 6-8 days for production on the reprint but they can send out some of the other parts (FUD and WSF) ahead if I want. Those would be pretty useless to me without the other parts so I asked them to just send everything in one go when it's ready. New ETA on shipping 22-24 days since the order.
Day 20: Shapeways gets in touch and lets me know the on inspection of the latest print the foot appears to have not survived the printing process. Am I happy to accept it as is?
As long as it looks to be a clean break I was happy to accept it, as I can then glue it on. No mention of the fingers in the email so I had my hopes high that this time they survived the printing process!
Day 23: Finally a notification to say things have shipped, yay!!
Day 24: The parts finally arrive and ..... I see problems :(
- Broken fingers ... I can live with that
- Protectron arms were warped so they looked lopsided and the parts wouldn't fit together quite right
- The shadows on the kid came out darker than expected, the area around the mouth for instance is fairly dark
- The biggest issue was the torso was blocked with glue or support material that shouldn't be there, so the wire route is blocked
After an exchange with Shapeways, I eventually settled on having to change my plan. I didn't want to have to go through all of this all over again, so I decided to change my power source from USB power to battery and cram it in the torso, and sand/cut the arms very carefully to get them to line up and fit too.
I know this sounds like I'm giving Shapeways a negative review, I'm reallynot! I've used Shapeways before and will no doubt use them again. Their customer service is pretty good and this was eventually resolved through a refund and was probably just a bad set of coincidences, but I basically had enough after all of this and wanted to just get cracking on things rather than delay them another 2 weeks.
Modifying the plan / Circuit


As the torso was blocked, I couldn't run the wires via the route it as originally planned. I attempted to drill it out with a hand drill which worked to a point, but I couldn't clear it completely as it invovled two 90 degree turns in a very tight 1cm space, so unless I cut the torso in half to get the drill into the right position, that was a no-go. So I abandoned the USB powered wire route that was going to go through the base, leg and then torso.
Leave out the LEDs? ...... Nah! Time to look at cramming batteries as best as I can into the torso as new power source.
Armed with my trusty digital calipers, I measured the space available in the torso and started looking into batteries that could both fit in the torso and also power the LEDs for a half decent amount of time. Some fit but would only power it for 30 mins, while other would would power it for hours, but were too big for the space available. In the end I went for the 4LR44 battery (which is basically 4x LR44 button batteries in serial). I was considering a rechargeable battery and have a micro USB circuit to plug into a recharge things without having to take anything out the protectron, but it just got too complicated with such a cramped space. Removeable batteries it was.
As I would eventually need to swap batteries in and out, I wanted a battery clip rather than solder anything directly to the battery. After hunting around on eBay, I found one small enough in profile to fit .... or so I thought. It looks like I bought one slighly too big, but luckily it's all plastic and thin metal contacts that I can bend to my will!
Painting / Smoothing
Not much to paint, not much to say. I tried to polish the dome with fine sand paper (up to 1200 grit) and whilst this certainly made it more transparent, it unfortuntatly didn't become completely transparent. I think it was because I couldn't polish the inner curvature easily. The idea was to "tint" the dome blue with some Tamiya clear blue, and whilst I still like the color it was more opaque than I planned. The only other parts to paint were the coiled wires and reflector on the protectrons head.
Now in the magazine cover the joints and the hips are chromed. I'm 90% sure I chose not to do this because it was awkward and I just wanted to get it done (this project had spanned months by this point from the time it was started). I may come back at a later date and chrome them, but I decided to leave them un-chromed. Having them un-chromed did grow on me over time, but the option to correct this later is perfectly viable. I also couldn't quite get the shoe covers to look right when I was making them out of the green material I had, so I left those out too. I'm fairly sure, like the chrome, I can add these later if I ever chose to re-visit this. I'll make a new post if I do this in the future and link it here.
I also gave the FCS parts a light sand and clear coat in order to try and remove some of the rough texture. It also has the added benefit of making the colours deeper and in some places cause colour edges to get a bit sharper.
The base is a simple disc and made from WSF so it's farly durable. So I hot glued a temporary nail into the bottom of it, attached it to the drill and spun it over some sandpaper which made short work of smoothing it. I'll have to remember this trick for the future.
Assembly
Finally it's time to put it all together. I had to solder the wires in situ, which was pretty awkward but eventually I got it done. I glued the leds in the arms to stop them moving and also some copper coins into the base as additional weight now that the plan had changed and a circuit wasn't there taking up space anymore.
So a lot of thing went wrong with the project, but all-in-all, I am still very happy with it. The blocked torso certainly added in some extra complication.
On hind sight there are things I could have changed to improve this; if I separated the leg joints at the hip rather than the thigh would have allowed me to clear any blockages. The fingers posed together rather than separate would have probably avoiced them snapping. Everything's a learning experience though, so I'll try and consider this type of issue on the next FCS project :)


Quite the ingenious idea cramming the battery pack into the torso, i probably would've given up powering the LED's in your position! your modelling skills are fantastic where did you learn?
ReplyDeleteThanks :)
DeletePretty much self taught over the years. Not every one of them is a success however, I still have a folder full of unfinished projects ... one day I shall finish them ... one day